
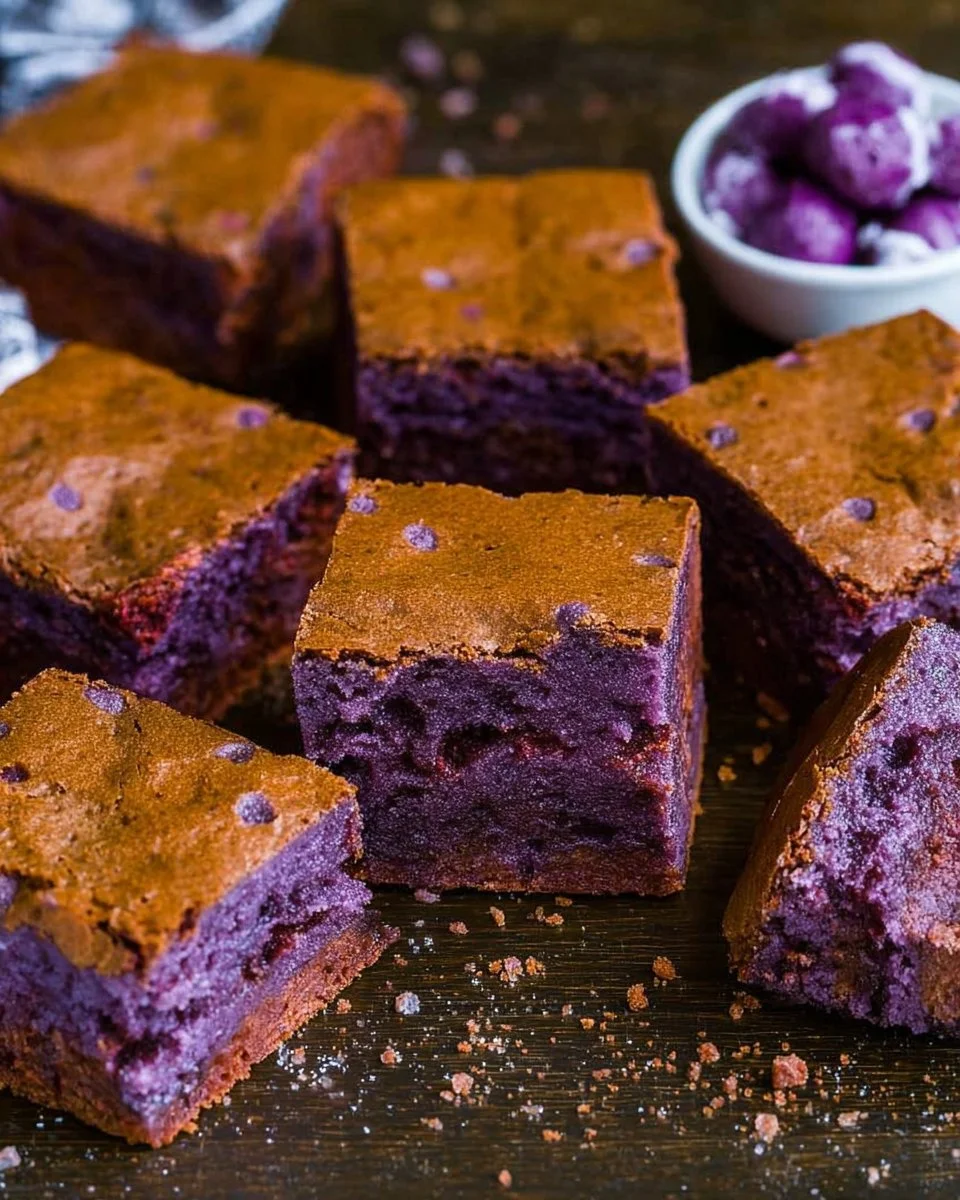
Picture this: you’re savoring a rich, fudgy brownie infused with the unique and delightful flavor of ube. It’s not just a treat; it’s a game changer. These Ube Brownies are not only scrumptious but also cater to your health goals. Imagine delighting your family with a dessert that is lower in calories but full of taste, making it perfect for meal prep. Whether you’re mindful of blood sugar levels or simply looking to indulge without guilt, these brownies are the answer. The vibrant purple hue will captivate the senses, while the creamy texture keeps everyone coming back for more. Don’t worry if you’re short on time; this recipe is designed for busy families or anyone prepping meals for the week. Trust us, these brownies are a delightful addition to your healthy lifestyle.
Why You’ll Love How To Make Ube Brownies (Creamy, Easy, and Cozy)
These Ube Brownies offer a perfect blend of rich flavor and heartiness that both kids and adults will love. The fudgy texture makes each bite melt in your mouth, while the ube adds a subtle sweetness without any added sugars. This recipe takes traditional brownies to the next level while keeping them blood sugar friendly, making them suitable for a range of dietary needs.
Not only are these brownies delicious, but they are also packed with health benefits. You get a dose of healthy fats and protein, making them ideal for a busy week’s treat or a guilt-free dessert for any occasion. Plus, they store well, making it easy to incorporate them into your meal prep routine. Let’s face it; every family faces the challenge of balancing healthy eating and pleasing those picky eaters. Ube Brownies are here to make that easier for you!
- Quick to make: Whip these up in under an hour.
- Fudgy texture: Indulge in a rich, satisfying brownie.
- Pantry-friendly: Most ingredients are easy to find.
- Meal-prep friendly: Make them in advance to enjoy throughout the week.
- Dietary notes: Gluten-free and low in refined sugars.
- Health positioning: High protein: satisfies your cravings while fitting your nutrition goals.
- Kid-friendly: Even the little ones will love these treats.
{image_template}
Ingredients for How To Make Ube Brownies
- Warm Eggs – for fluffiness and binding, providing structure.
- Granulated Sugar – sweetens without overpowering the ube flavor.
- Ube Halaya or Purple Yam Powder – the star ingredient that imparts unique flavor and color.
- Light Brown Sugar – adds a hint of caramel and depth to the brownies.
- Unsalted Butter – creates moist richness, enhancing the brownie experience.
- White Chocolate Bars – contributes creaminess and balance against the ube.
- Vanilla Extract – rounds out flavors for a more complex taste.
- Salt – heightens sweetness and enhances flavors.
- All-Purpose Flour – provides structure and a classic brownie base.
- Dark Chocolate Bars – infuses richness and a delightful contrast.
Ready to cook? See the recipe card for exact measurements below.
How to Make How To Make Ube Brownies
Phase 1 – Prep
- Preheat your oven to 350°F (175°C).
- Line an 8-inch square baking pan with parchment paper for easy removal.
- In a large mixing bowl, melt the unsalted butter and white chocolate bars together over low heat, stirring constantly to ensure a smooth mixture.
- Remove from heat and allow it to cool slightly.
- Whisk together the warm eggs, both sugars, and vanilla extract until well combined.
Phase 2 – Cook/Assemble
- Gradually mix the melted butter and white chocolate into the egg mixture until fully incorporated.
- In a separate bowl, combine the ube halaya, flour, salt, and dark chocolate pieces. Slowly add this dry mixture to the wet ingredients, stirring gently until just combined.
- Pour the brownie batter into the prepared baking pan, smoothing the top with a spatula.
- Bake in the preheated oven for 25-30 minutes. The brownies should be set around the edges but still slightly soft in the center.
- Allow the brownies to cool completely in the pan before cutting into squares.
Phase 3 – Serve
- Once cooled, lift the brownies out using the parchment paper.
- Cut into generous squares and arrange them on a serving platter.
- For an extra touch, drizzle with melted dark chocolate or sprinkle with powdered sugar.
- Serve at room temperature or chilled for a denser texture.
Pro Tips for the Best Results
- For a richer flavor, consider adding chopped nuts or a swirl of peanut butter into the batter before baking.
- Store leftovers in an airtight container at room temperature for up to 3 days.
- For a gluten-free version, substitute all-purpose flour with a gluten-free flour blend.
- Allow the brownies to cool completely for easier cutting; warm brownies can crumble.
- Try adding a pinch of espresso powder to intensify the chocolate flavor.
- For meal prep enthusiasts, make a double batch and freeze extras in individual portions.
- Use a non-stick spray for the baking pan if you prefer not to use parchment paper.
Common Mistakes to Avoid
One common mistake when making brownies is overmixing the batter. This can lead to dense and cakey brownies instead of the lush, fudgy texture we desire. To avoid this, mix just until the ingredients are incorporated; a few lumps are perfectly fine.
Another pitfall is baking the brownies for too long. Remember that they will continue to bake in the pan after removing from the oven. Checking for doneness at around 25 minutes is a good rule of thumb, as they should still be slightly soft in the center when you take them out.
Lastly, not letting them cool completely before cutting can spoil the perfect texture. It’s tempting to dig in right away, but patience is key to achieving clean cuts and a satisfying brownie experience.
Recipe Variations
- Gluten-Free: Use a 1:1 gluten-free flour blend for a similar texture.
- Dairy-Free: Substitute unsalted butter with coconut oil or a dairy-free butter alternative.
- Spicy: Add a dash of chili powder or cayenne for a surprising kick.
- Herbal: Infuse the butter with fresh mint leaves while melting for an aromatic twist.
- Air Fryer: Cook at 320°F (160°C) for 20 minutes in a preheated air fryer for delightful results.
- Instant Pot: Use a pressure cooker insert to prepare brownies with a steaming method; adjust time to 25-30 minutes.
How to Serve How To Make Ube Brownies
- Best Pairings: Serve with a scoop of vanilla ice cream or a dollop of whipped cream for a luscious treat.
- Toppings: Consider a drizzle of melted white chocolate or a sprinkle of toasted coconut.
- Garnishes: Fresh berries or a dusting of powdered sugar can elevate presentation.
Make Ahead & Storage
Can I Meal Prep This?
Yes, these Ube Brownies are perfect for meal prep! Prepare a batch at the beginning of the week and enjoy them as a healthy snack or dessert.
Storing Leftovers
Store any leftover brownies in an airtight container at room temperature for up to 3 days to maintain their fudgy texture.
Freezing
These brownies freeze beautifully! Wrap individual squares in plastic wrap and store them in a freezer-safe container for up to 3 months. Thaw at room temperature before serving.
Reheating
To reheat, place brownies in an oven set to 350°F (175°C) for about 5-10 minutes. Alternatively, you can microwave for 10-15 seconds for a warm treat.
FAQs
Can I use fresh ube instead of ube halaya? Yes, you can use fresh ube, but make sure to steam and mash it before adding it to the batter.
Are Ube Brownies suitable for kids? Absolutely! They’re perfect for a fun treat that kids will enjoy without all the guilt.
How do I know when the brownies are done? The edges should look set, and a toothpick inserted in the center should come out with moist crumbs.
Can I use a different type of chocolate? Yes, you can experiment with semi-sweet or even dark chocolate, but adjust the sugar accordingly.
Try these delicious Ube Brownies for a satisfying dessert that aligns with your healthy lifestyle. They are low calorie, macro-friendly, and packed with flavor. Don’t forget to rate and comment on your experience, or check out our healthy desserts for more great ideas!
How To Make Ube Brownies
Ingredients
For the brownie batter
- 2 large Warm Eggs for fluffiness and binding, providing structure.
- 1 cup Granulated Sugar sweetens without overpowering the ube flavor.
- 1 cup Ube Halaya or Purple Yam Powder the star ingredient that imparts unique flavor and color.
- 1/2 cup Light Brown Sugar adds a hint of caramel and depth to the brownies.
- 1/2 cup Unsalted Butter creates moist richness, enhancing the brownie experience.
- 1 bar White Chocolate Bars contributes creaminess and balance against the ube.
- 1 teaspoon Vanilla Extract rounds out flavors for a more complex taste.
- 1/4 teaspoon Salt heightens sweetness and enhances flavors.
- 1 cup All-Purpose Flour provides structure and a classic brownie base.
- 1 bar Dark Chocolate Bars infuses richness and a delightful contrast.
Instructions
Phase 1 – Prep
- Preheat your oven to 350°F (175°C).
- Line an 8-inch square baking pan with parchment paper for easy removal.
- In a large mixing bowl, melt the unsalted butter and white chocolate bars together over low heat, stirring constantly to ensure a smooth mixture.
- Remove from heat and allow it to cool slightly.
- Whisk together the warm eggs, both sugars, and vanilla extract until well combined.
Phase 2 – Cook/Assemble
- Gradually mix the melted butter and white chocolate into the egg mixture until fully incorporated.
- In a separate bowl, combine the ube halaya, flour, salt, and dark chocolate pieces. Slowly add this dry mixture to the wet ingredients, stirring gently until just combined.
- Pour the brownie batter into the prepared baking pan, smoothing the top with a spatula.
- Bake in the preheated oven for 25-30 minutes. The brownies should be set around the edges but still slightly soft in the center.
- Allow the brownies to cool completely in the pan before cutting into squares.
Phase 3 – Serve
- Once cooled, lift the brownies out using the parchment paper.
- Cut into generous squares and arrange them on a serving platter.
- For an extra touch, drizzle with melted dark chocolate or sprinkle with powdered sugar.
- Serve at room temperature or chilled for a denser texture.