
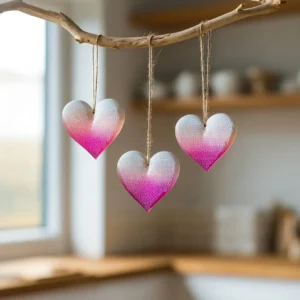
Welcome to the world of DIY that’s as charming as it is colorful! Today, we’re diving into making beautiful crystal heart ornaments that are not only visually stunning but also an absolute treat to create. Imagine shimmering hearts that catch the light, each one unique, perfect for decorating your room or making heartfelt gifts for friends and family. These ornaments are an easy, fun craft project for anyone, plus they bring a cozy touch to your home, especially around special occasions like Valentine’s Day or even just to brighten up a winter day. You’ll love how simple they are to make, needing just a few everyday ingredients. Now let’s get those creative juices flowing!
Why You’ll Love DIY Crystal Heart Ornaments: Simple Tutorial for Stunning Decor
Making your own crystal heart ornaments is not just a craft; it’s a delightful experience! These sparkling hearts are a perfect blend of creativity and fun. They are incredibly easy to make, requiring minimal materials while allowing for tons of customization. You can use them as gifts, festive decor, or simply as a lovely way to brighten up your space. Plus, they’re a great way to spend time with family and friends and share laughter and creativity!
- Quick and Fun: Perfect afternoon activity that’s fast to create!
- Customizable: Choose your favorite colors and shapes.
- Great for Gifting: Add a personal touch to your presents.
- Seasonal Decor: Ideal for various holidays or just to add sparkle.
- Easy on the Wallet: Made with pantry-friendly ingredients!
Essential Ingredients for DIY Crystal Heart Ornaments
- Water: The base for your crystal solution.
- Table Salt: Creates crystals that sparkle and shine.
- Food Coloring: For that wonderful pop of color!
- String or Ribbon: To hang your lovely creations.
- Heart-Shaped Cookie Cutters: Essential for shaping the ornaments.
Ready to cook? See the recipe card for exact measurements below.
How to Make DIY Crystal Heart Ornaments
Phase 1 – Prep
- Gather all your materials: water, table salt, food coloring, string, cookie cutters, and a mixing bowl.
- Prepare your workspace: Spread out some newspaper or a tablecloth to catch any spills.
- Mix your salt solution: Combine water and salt in your mixing bowl until the salt fully dissolves.
Phase 2 – Cook/Assemble
- Stir in a few drops of food coloring to your saltwater mixture for a vibrant finish.
- Place your heart-shaped cookie cutter on a flat surface.
- Carefully pour the colorful solution into the cookie cutter, filling it to the brim.
- Use string or ribbon to make a loop for hanging, laying it across the top of the mixture before it sets.
Phase 3 – Serve
- Allow the crystals to form: Leave your creations undisturbed in a cool area for 24-48 hours.
- Carefully remove the hardened hearts from the cookie cutter.
- Hang them up or package them as gifts for friends and family!
Pro Tips for the Best Results
- Try using flavored gelatin instead of food coloring for a fun twist on texture and taste!
- For a smoother finish, stir your salt solution until it’s perfectly mixed before pouring.
- Store your ornaments in a cool, dry area to keep them sparkling and beautiful.
Common Mistakes to Avoid
One common mistake is not dissolving the salt completely. When this happens, your crystals won’t form correctly. Make sure you mix until the solution is clear!
Another issue can arise from using too much water. If your mixture is too watery, the crystals will be small and less formed. Stick to a balanced ratio for the best results.
Lastly, using the wrong type of coloring can result in duller colors. Stick with food coloring for vibrant finishes and brighter ornaments!
Recipe Variations
- Use glitter or metallic food color for a dazzling effect.
- Add essential oils for a scented decoration.
- Experiment with different shapes and sizes beyond hearts!
How to Serve DIY Crystal Heart Ornaments
- Best Pairings: Display in groups for a cheerful centerpiece.
- Toppings & Garnishes: Consider adding dried flowers around your hearts for extra flair.
Make Ahead & Storage
Can I Meal Prep This?
Yes! These ornaments can be prepared ahead of time and stored until you’re ready to display them.
Storing Leftovers
Keep any leftover ornaments in a dry place, away from moisture, for up to a month.
Freezing
Freezing is not recommended as it can affect the crystal structure and appearance.
Reheating
Reheating isn’t necessary; just let them air dry if they get damp.
FAQs
Can I use frozen water? Frozen water isn’t ideal since you need warm water to dissolve the salt properly.
How do I make them extra colorful? Add more food coloring until you reach your desired shade!
Can I double the recipe? Absolutely! Just make sure you have enough cookie cutters ready.
How do I fix a too-thick mixture? Mix in a little extra water to achieve the right consistency.
These DIY Crystal Heart Ornaments are such a fun, creative project to brighten your home and make special gifts for loved ones. The best part is how easy they are to make and personalize! Give it a try, and don’t forget to let us know how yours turn out. Happy crafting!
Crystal Heart Ornaments
Ingredients
For the crystal solution
- 1 cup Water Base for your crystal solution.
- 1 cup Table Salt Creates crystals that sparkle and shine.
- a few drops Food Coloring For that wonderful pop of color!
For assembling
- as needed String or Ribbon To hang your lovely creations.
- 2-3 Heart-Shaped Cookie Cutters Essential for shaping the ornaments.
Instructions
Preparation
- Gather all your materials: water, table salt, food coloring, string, cookie cutters, and a mixing bowl.
- Prepare your workspace by spreading out some newspaper or a tablecloth to catch any spills.
- Combine water and salt in your mixing bowl until the salt fully dissolves.
Cooking & Assembly
- Stir in a few drops of food coloring to your saltwater mixture for a vibrant finish.
- Place your heart-shaped cookie cutter on a flat surface.
- Carefully pour the colorful solution into the cookie cutter, filling it to the brim.
- Use string or ribbon to make a loop for hanging, laying it across the top of the mixture before it sets.
Serving
- Allow the crystals to form by leaving your creations undisturbed in a cool area for 24-48 hours.
- Carefully remove the hardened hearts from the cookie cutter.
- Hang them up or package them as gifts for friends and family.