
Have you ever wanted to create something magical in your own kitchen? Imagine sprouting fluffy, sparkling crystal trees right before your eyes! It’s like a mini science fair project but with a sprinkle of creativity. Using just a few simple ingredients—many of which you probably have at home—we’ll turn a regular afternoon into an enchanting adventure. While you and your kids watch these delicate trees grow, you’ll also be having fun exploring the science behind it all. So, grab your baking soda and let’s dive into this easy and fun project that will surely delight both young scientists and their parents!
The best part? This project is not just about kids having fun; it’s packed with learning opportunities, from understanding crystalline structures to the cooling process of water-based solutions. Plus, these baking soda crystal trees make a perfect centerpiece or fun décor piece to enjoy while chatting about your day. It’s a sensory experience too—imagine that fizzy reaction when you combine vinegar and baking soda, the way the crystals slowly appear over time, sparkling in the light.
Whether you are a seasoned science buff or simply looking for a creative outlet with your kids, this project is a total win. Trust me, you’ll love this unique blend of art and science, and your kids will feel so proud unveiling their beautiful creations!
Why You’ll Love Creating Stunning Baking Soda Crystal Trees with Kids
Creating stunning baking soda crystal trees is a delightful experience for everyone involved. Not only are you engaging in a fun project, but you’re also teaching kids about chemistry and patience. Watching these magical crystals grow is an unforgettable sight.
Here are a few reasons why you’ll appreciate this project:
- Speed: No need to wait all day; you’ll see results in just a few hours!
- Pantry-Friendly: Most of the ingredients are kitchen staples, making it easy to whip up.
- Educational: Kids learn about crystals and scientific reactions in a fun way.
- Creative Outlet: Personalize your trees with different colors and designs.
- Cost-Effective: Minimal ingredients mean minimal cost!
- Perfect for All Ages: Kids of all ages can participate, making this family-friendly.
Now that we’ve whetted your appetite for this project, let’s get into the nitty-gritty of what you need to create these stunning crystal trees.
What You Need for Creating Stunning Baking Soda Crystal Trees
- Baking Soda – This is the star of the show! It’s what helps create the crystals.
- Vinegar – This acidic ingredient works wonders, creating a fun fizzing reaction.
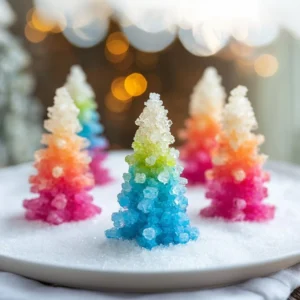
- Food Coloring – Use your favorite colors to make your trees vibrant and eye-catching.
- Water – Essential for dissolving and creating the right environment for the crystals to form.
- Pipe Cleaners – These will serve as the branches and trunk of your crystal trees.
Ready to cook? See the recipe card for exact measurements below.
How to Make Stunning Baking Soda Crystal Trees
Phase 1 – Prep
- Gather your materials: baking soda, vinegar, water, food coloring, and pipe cleaners.
- Shape the pipe cleaners into tree forms—think of the branches reaching out. You can make a classic tree shape or let your imagination run wild!
- Mix the baking soda and water in a bowl until it becomes a thick paste—this will help the crystals stick as they grow.
Phase 2 – Cook/Assemble
- Dip your shaped pipe cleaner trees into the baking soda mixture, ensuring they’re thoroughly coated.
- Place them on a tray lined with wax paper to catch any excess.
- In a separate bowl, mix vinegar with food coloring and slowly pour it over the trees. Watch the fizzing action—it’s like a magic show right in your kitchen!
Phase 3 – Serve
- Allow your trees to sit undisturbed for several hours, or even overnight, to let the crystals form.
- Once the crystals have grown, gently remove the trees from the wax paper and display them.
- Show them off to family and friends, and enjoy the sparkle of your homemade crystal creations!
Pro Tips for the Best Results
- Use more vinegar: If your trees aren’t fizzing enough, a little extra vinegar can work wonders.
- Experiment with colors: Try mixing different food coloring for unique shades and effects.
- Store extra crystals: If you make more than one batch, save the extra crystals in a sealed container for future projects.
- Keep it steady: Avoid moving your tray while the crystals are forming to get the best results.
Common Mistakes to Avoid
Not Using Enough Vinegar
One common mistake is not pouring enough vinegar over the trees. This can lead to less fizzing and fewer crystals. Remember, the vinegar reaction is key to creating that beautiful crystalline effect! Make sure you’re generous when you pour.
Moving the Trees Too Soon
Another mistake is moving the trees before the crystals have fully formed. Patience is key here! The longer you let them sit, the more impressive their growth will be. Try to resist the urge to touch until they’re fully set.
Using Too Much Water in the Mixture
Sometimes, using too much water in the baking soda mix can dilute the crystal growth. You want a thick paste—not soupy! Achieving the right consistency is essential for those gorgeous, sparkly trees!
Recipe Variations
- Glittery Trees: Add some edible glitter to the baking soda mixture for extra sparkle.
- Color Swaps: Use different colors for each batch to create a rainbow-themed display.
- Different Shapes: Instead of trees, try making stars or other holiday shapes with the pipe cleaners.
How to Serve Your Crystal Trees
- Display in Sunlight: Place them on a windowsill for a shimmering effect.
- In a Jar: Put them in mason jars for a fun decoration.
- As Party Decor: Use them to liven up a party table or science-themed gathering.
Make Ahead & Storage
Can I Meal Prep This?
Yes! You can prepare the pipe cleaner shapes in advance; however, it’s best to do the final steps closer to when you want to see them grow.
Storing Leftovers
Store extra baking soda and vinegar separately in cool, dry places if you want to make more trees another day.
Freezing
It’s not necessary to freeze these as they are best fresh, but you can keep leftover crystals in a sealed container at room temperature.
Reheating
Not applicable here, as this project doesn’t involve reheating!
FAQs
Can I use colored vinegar?
Absolutely! It can add a lovely hue to your crystals and is a great way to mix it up.
What if my trees don’t grow crystals?
Check if you used enough baking soda and vinegar, and ensure they were left undisturbed.
Can I double the recipe?
Yes! Just keep the ratio of ingredients the same, and feel free to get creative with different shapes.
How do I clean up the mess?
A damp cloth or paper towel works great to wipe away any excess baking soda residue after the project is done.
Creating stunning baking soda crystal trees with kids isn’t just a fun science experiment; it’s a way to bond, learn, and be creative together. You’ll appreciate how simple ingredients can transform into something magical. If you enjoyed this project, consider trying out other creative recipes or science experiments to keep the fun going!
Baking Soda Crystal Trees
Ingredients
For the crystal tree
- 1 cup baking soda The main ingredient for creating the crystals.
- 1/2 cup water Used to dissolve the baking soda.
- 1/2 cup vinegar Creates a fizzy reaction essential for the crystal growth.
- Food coloring your favorite colors Adds color to your crystal trees.
- 2-3 pieces pipe cleaners Shaped into tree forms for the crystal growth.
Instructions
Preparation
- Gather your materials: baking soda, vinegar, water, food coloring, and pipe cleaners.
- Shape the pipe cleaners into tree forms.
- Mix the baking soda and water in a bowl until it becomes a thick paste.
Cook/Assemble
- Dip your shaped pipe cleaner trees into the baking soda mixture, ensuring they are thoroughly coated.
- Place them on a tray lined with wax paper.
- Mix vinegar with food coloring and pour it over the trees, watching the fizzing action.
Serve
- Allow trees to sit undisturbed for several hours or overnight to let the crystals form.
- Once formed, gently remove the trees and display them.