Have you ever wanted to capture the sunshine and bring a splash of color indoors? This DIY Clear Glue Suncatcher craft is the perfect way to do just that! Using simple materials you probably already have at home, this project transforms ordinary clear glue into a stunning piece of art. Imagine the warm sunlight pouring through your window, casting vibrant hues everywhere, like a rainbow made just for you.
This craft is not only fun but also incredibly easy to make. Kids and adults alike will love getting hands-on with this project, mixing colors and creating unique designs. Plus, it’s a great way to add a personal touch to your home decor or give as a heartfelt gift. You won’t believe how satisfying it is to peel off the suncatcher once it dries, revealing all those beautiful layers of color! Whether you’re looking for a weekend activity or a crafty afternoon project, this suncatcher will brighten up your day!
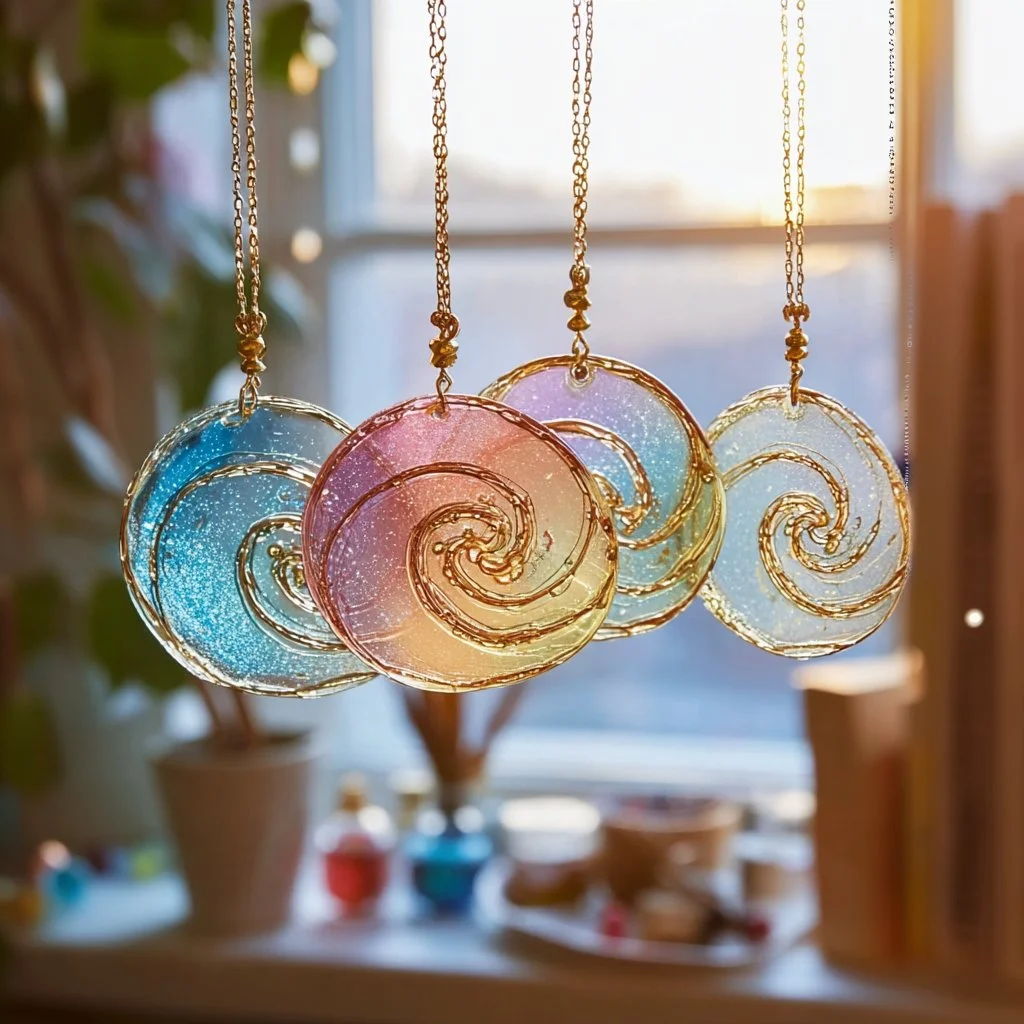
Why You’ll Love Clear Glue Suncatcher Craft: DIY Colorful Art (Creamy, Easy, and Cozy)
This suncatcher craft is an exciting blend of art and science—how cool is that? While it involves clear glue and a few vibrant colors, the simplicity of the process makes it a fantastic project for all ages. Here are a few reasons why you’ll absolutely love making this suncatcher:
- Quick and Easy: You can whip this up in no time! Just a few simple steps, and you’ll be ready to hang your masterpiece.
- Creative Expression: Use any colors you like! Mix and match to create stunning designs that reflect your personality.
- Budget-Friendly: All you need are common supplies—clear glue, food coloring, and a surface to work on—no fancy materials required!
- Family Fun: It’s a delightful activity for kids. Get the whole family involved, and you’ll have a blast creating together.
- Beautiful Decor: Once done, these suncatchers make eye-catching decor pieces that brighten up any room.
- Flexible Design: Use any shape or pattern! You’re the artist, so let your imagination run wild.
- Perfect for Gifting: These suncatchers are thoughtful gifts for friends or loved ones, too!
There’s something truly special about creating art that also interacts with nature. Ready to channel your inner artist? Let’s gather our supplies and get started on this colorful journey!
Ingredients for Clear Glue Suncatcher Craft: DIY Colorful Art
- Clear Glue – This is the base of your suncatcher, providing that gorgeous glossy finish once dried.
- Food Coloring – A small drop goes a long way! Use it to add vibrant colors to your suncatcher.
- Baking Sheet or Parchment Paper – A sturdy surface to work on that makes peeling off your creation a breeze.
- Paintbrush or Toothpick – For spreading the glue and designating details.
- Optional Glitter – For those who love a little sparkle, glitter can add a fun touch!
Ready to cook? See the recipe card for exact measurements below.
How to Make Clear Glue Suncatcher Craft: DIY Colorful Art
Phase 1 – Prep
- Gather Your Materials: Collect all your supplies and ensure they’re nearby. A clean workspace is super helpful!
- Prepare Your Surface: Line your baking sheet with parchment paper. This will prevent sticking and ensure easy removal later.
- Plan Your Design: Think about the shapes or patterns you want to create. You can sketch them lightly on the parchment paper if you want.
Phase 2 – Cook/Assemble
- Mix Your Colors: In a bowl, squeeze some clear glue and add drops of food coloring. Mix until you get your desired shade.
- Start Creating: Use your brush or toothpick to spread the colored glue onto the parchment paper. Make shapes, swirls, or even abstract designs!
- Layer It Up: You can layer colors for a deeper effect. Just be mindful of letting each layer dry a bit before adding another color on top.
Phase 3 – Serve
- Dry Time: Allow your suncatcher to dry completely—this might take a few hours or even overnight. The anticipation will be worth it!
- Peel Off Your Art: Once dried, gently peel off your suncatcher from the parchment paper. It should come off easily, revealing your colorful masterpiece.
- Display Your Creation: Hang it in a window or anywhere light shines through to see the colors pop!
Pro Tips for the Best Results
- Color Mixing: Experiment with different food coloring combinations for unique shades!
- Thickness: Ensure your glue isn’t too thick or too thin for easier manipulation.
- Storage: Keep leftover glue in an airtight container for your next crafting day.
- Design Idea: Use cookie cutters as a template to create fun shapes.
- Experiment Beyond: Try adding other materials like leaves or glitter along with the color for more texture.
Common Mistakes to Avoid
One of the common mistakes is using too much glue. If your layers are too thick, it can take forever to dry and might end up messy! The fix? Go easy on the glue—start with a thin layer, and you can always add more if you want.
Another slip happens when colors mix too much. If you pour them all in one spot, they might turn into a muddy brown! Instead, keep the colors separate or create clear boundaries between them.
Lastly, skipping the dry time can be tempting, especially when you’re eager to see your art! Resist that temptation; peeling them off too early can ruin your design. Just be patient and let them dry completely for the best results!
Recipe Variations
- Add Natural Dyes: Use beet juice or turmeric for colorful and healthier alternatives.
- Sparkle Factor: If you love glitz, sprinkle in some glitter before it dries for a twinkly effect.
- Different Shapes: Experiment with different templates or freehand designs to keep things interesting.
How to Serve Clear Glue Suncatcher Craft
- Best Pairings: Hang your suncatcher in a sunny window or use it as a centerpiece in a well-lit room.
- Toppings & Garnishes: If displaying outdoors, consider using it with other crafty decor like wind chimes or flower pots.
Make Ahead & Storage
Can I Meal Prep This?
Yes, you can prepare your supplies ahead of time! Just assemble and leave them to dry when you’re ready.
Storing Leftovers
Leftover glue can be stored in an airtight container for a week in a cool, dry place. Just give it a good stir before the next use.
Freezing
Freezing isn’t recommended for glue, but if you have any colored glue leftover, it’s best to use it fresh!
Reheating
N/A, as this project uses craft glue that doesn’t require reheating.
FAQs
Can I use different kinds of glue?
Yes! You can use craft glue, but clear glue gives the best glossy finish.
How to fix bubbles in the glue?
Lightly tap the surface where the bubble is with a toothpick to release it, or gently smooth it out with your brush.
Can I double the recipe?
Absolutely! Just keep in mind that you’ll need a larger space to work in and more materials.
Is there a way to add smells?
Yes! A drop of vanilla or essential oils can create a scented suncatcher while it dries.
Try making this Clear Glue Suncatcher Craft today! It’s a fantastic way to embrace your creativity and bring vibrant light into your space. Capture those magical colors and let your imagination shine! Be sure to rate or comment on how yours turned out and maybe check out other fun craft ideas.

Clear Glue Suncatcher
Ingredients
Main ingredients
- 1 bottle Clear Glue Base for your suncatcher
- A few drops Food Coloring Use various colors for vibrant designs
- 1 sheet Baking Sheet or Parchment Paper Surface to work on
- 1 tool Paintbrush or Toothpick For applying and detailing
- Optional Glitter For added sparkle
Instructions
Preparation
- Gather your materials and ensure they are close by.
- Line your baking sheet with parchment paper.
- Plan your design and sketch it lightly on the parchment if desired.
Cook/Assemble
- In a bowl, squeeze some clear glue and add drops of food coloring to mix.
- Use a brush or toothpick to spread the colored glue onto the parchment paper.
- Layer colors for deeper effects, allowing each layer to dry slightly before adding more.
Serve
- Allow your suncatcher to dry completely, which may take several hours or overnight.
- Gently peel the suncatcher off the parchment paper once dried.
- Hang the suncatcher in a light-exposed area to see the colors shine.