Welcome to a world of creativity and delightful colors with our Clear Glue Flower Suncatcher Craft. This engaging DIY project not only brings joy to your family, but it also offers a unique way to decorate your windows with vibrant flower designs. Perfect for busy families, this craft is a fun activity that allows your kids to express themselves artistically while you enjoy peaceful moments. Using simple materials, this craft embodies a healthy lifestyle that promotes creativity and is great for family bonding time.
As the sun filters through the translucent colors, imagine the gentle glow that dances across your room, transforming ordinary spaces into a canvas of color. This suncatcher isn’t just a pretty decor item; it’s a source of joy and warmth, making your home feel cozy and inviting. In a world running at a fast pace, this special craft stands still, allowing you to take a moment and appreciate the beauty of nature and artistry. Gather your supplies and get ready to create something truly beautiful with the Clear Glue Flower Suncatcher Craft!
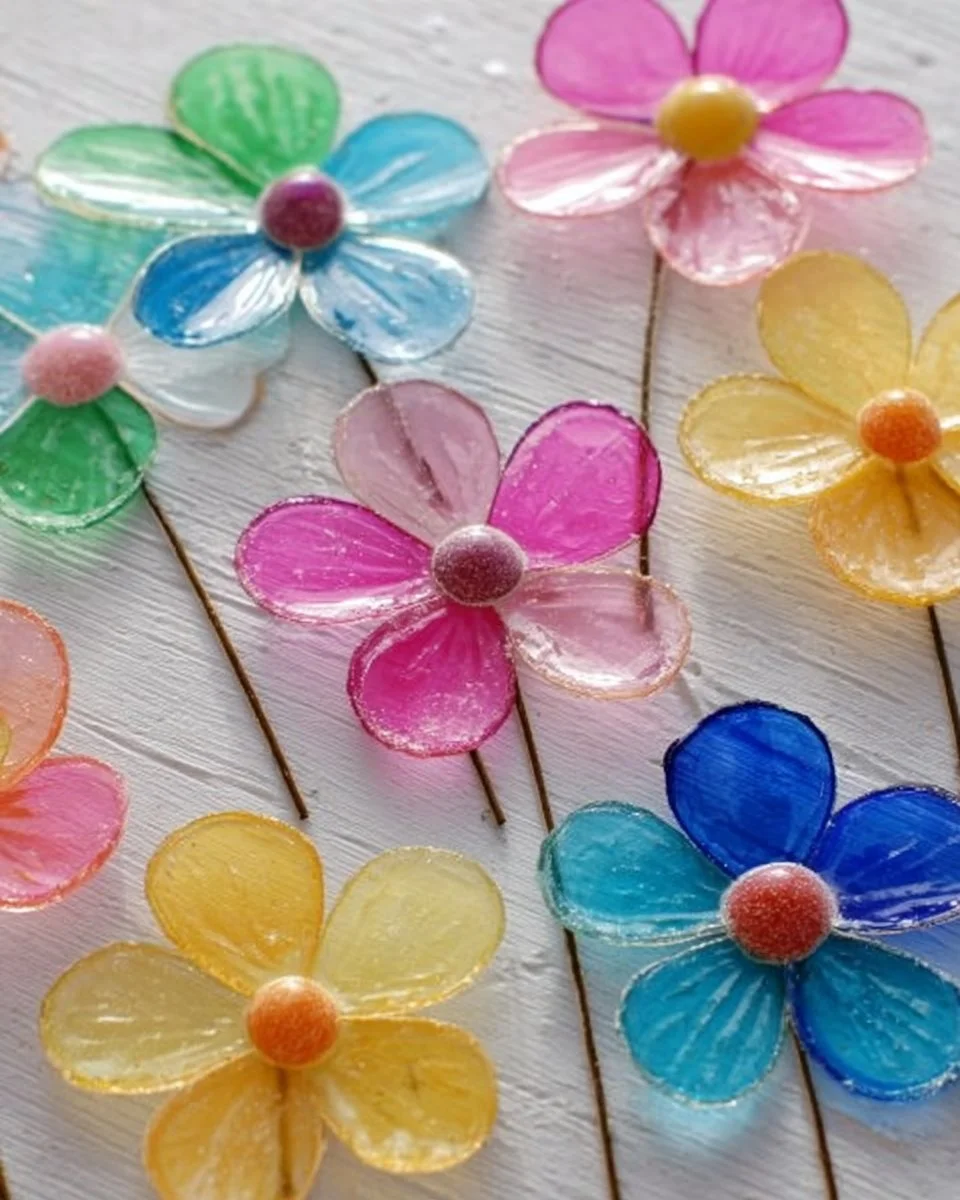
Why You’ll Love Clear Glue Flower Suncatcher Craft | Easy DIY Kids Craft and Window Decor
This craft is perfect for families looking to create memorable decor while spending quality time together! With just a few materials, it sparks creativity in kids and beautifies your home.
Engaging in a fun activity with your kids not only fosters creativity but encourages teamwork and stimulates their imagination. By using clear glue, vibrant colors, and simple flower templates, this suncatcher becomes a canvas for your children’s artistic expression. The satisfaction of seeing their personalized creations adorning your windows brings a wave of joy to the entire family, enhancing that cozy atmosphere in your home.
This craft is also versatile, allowing you to adapt it to different themes or seasons. Whether you’re preparing for spring, summer, or festive occasions, your charming floral designs will be the talk of the neighborhood! Furthermore, this project can be completed in under an hour, making it a perfect weekend activity or a relaxing after-school adventure. Here are a few benefits of this lovely DIY project:
- Quick and Easy: Complete in under 60 minutes.
- Promotes Creativity: Kids can experiment with colors and designs.
- Eco-Friendly Materials: Uses common household supplies.
- Encourages Family Bonding: Great for team collaboration.
- Seasonal Decor: Perfect for any time of year!
- Stimulates Artistic Skills: Kids learn while they create.
- Packs Well: Easy to store or hang on windows.
Ingredients for Clear Glue Flower Suncatcher Craft | Easy DIY Kids Craft and Window Decor
- Clear Glue – Forms the base of your suncatcher, allowing colors to blend beautifully.
- Food Coloring – Provides vibrant colors; use any shades to create your favorite flower hues.
- White Paper – Serves as your canvas; choose thicker paper for durability.
- Scissors – Essential for cutting out flower shapes and designs.
- Paintbrush – Helps spread glue evenly for a smooth finish.
- Plastic Wrap – A useful cover to prevent sticking while drying.
Ready to cook? See the recipe card for exact measurements below.
How to Make Clear Glue Flower Suncatcher Craft | Easy DIY Kids Craft and Window Decor
Phase 1 – Prep
- Gather all your materials and create a clean workspace. Having everything at hand will streamline the process.
- Cut out various flower templates on white paper. You can draw your own designs or find printable options online.
- Prepare your food coloring by mixing desired shades in small bowls or cups.
Phase 2 – Cook/Assemble
- Take a clean paintbrush and apply a generous layer of clear glue onto the paper flower templates you’ve created.
- Add a few drops of food coloring onto the glue. Swirl it around gently to create beautiful gradients and blends.
- Layer another piece of plastic wrap on top of your creation. This prevents it from sticking to surfaces while drying.
- Allow the suncatchers to dry completely for about 30 minutes, checking for transparency as the glue dries.
Phase 3 – Serve
- Once fully dried, carefully peel away the plastic wrap from your suncatcher.
- Hang your beautiful flower suncatchers in a sunny window and watch as the colors come alive!
- Feel free to create an entire collection for seasonal or holiday displays to keep your home feeling lively.
Pro Tips for the Best Results
- For a unique look, mix multiple colors together for a marbled effect.
- Using a thicker paper helps your suncatchers hold up better against moisture.
- Store the suncatchers in a flat, dry area to maintain their shape.
- Experiment with different shapes and sizes for added interest.
- A hairdryer on a cool setting can speed up the drying process!
Common Mistakes to Avoid
A common mistake is applying too much glue, which can cause colors to bleed and produce a muddy effect. Stick to a moderate amount for cleaner outcomes. Instead, focus on applying an even, generous layer without overloading any spots. You’ll be surprised at the difference!
Another pitfall is using the wrong type of paper. Lightweight paper can warp or tear during the application. Always select a sturdier white paper that can hold the glue and coloring without compromising the shape of your flowers.
Lastly, forgetting to allow sufficient drying time can lead to uneven or tacky surfaces. Always set a timer for at least 30 minutes and check for full transparency before removing any covering.
Recipe Variations
- Gluten-Free: Naturally gluten-free as it uses basic craft materials.
- Dairy-Free: This recipe contains no dairy ingredients.
- Spicy: Get creative with colors and shades to add a vibrant spice theme.
- Herbal: Incorporate actual pressed flowers into the mix for an organic touch.
- Air Fryer: Not applicable, but feel free to get creative with different craft materials!
How to Serve Clear Glue Flower Suncatcher Craft | Easy DIY Kids Craft and Window Decor
- Best Pairings: These suncatchers complement any spring or summer decor!
- Toppings: Add a pop of glitter for extra sparkle.
- Garnishes: Hang them with colorful string or ribbons.
Make Ahead & Storage
Can I Meal Prep This?
Yes, you can prepare these suncatchers in advance and store them for later use.
Storing Leftovers
Leftover supplies can be kept sealed in containers in a cool, dry spot for up to 6 months.
Freezing
Avoid freezing the completed suncatchers, as this may cause them to warp or lose their design.
Reheating
Reheating is not applicable, but always store them flat to retain their form.
FAQs
What kind of glue can I use for suncatchers? Clear school glue is perfect for crafting suncatchers as it dries transparent and holds colors well.
How can I hang my suncatchers? Use clear tape or suction cup hooks to easily hang them in the window.
Will the color fade over time? While vibrant, colors may fade slightly due to sun exposure. Consider rotating them out occasionally.
Can I involve younger children in this craft? Absolutely! Just supervise their use of scissors and potentially lower the glue levels.
The Clear Glue Flower Suncatcher Craft is not just a delightful DIY activity; it’s also a wonderful way to beautify your home. With its simple ingredients and magical results, you and your family will love creating these cheerful decorations together. Try making it now and see how this colorful craft can brighten your space and life! Don’t forget to rate your experience and check out related crafts on our site!
Clear Glue Flower Suncatcher Craft
Ingredients
Craft Materials
- 1 bottle Clear Glue Forms the base of your suncatcher, allowing colors to blend beautifully.
- Various drops Food Coloring Provides vibrant colors; use any shades to create your favorite flower hues.
- 1 sheet White Paper Serves as your canvas; choose thicker paper for durability.
- 1 each Scissors Essential for cutting out flower shapes and designs.
- 1 each Paintbrush Helps spread glue evenly for a smooth finish.
- 1 sheet Plastic Wrap A useful cover to prevent sticking while drying.
Instructions
Preparation
- Gather all your materials and create a clean workspace.
- Cut out various flower templates on white paper. You can draw your own designs or find printable options online.
- Prepare your food coloring by mixing desired shades in small bowls or cups.
Cook/Assemble
- Take a clean paintbrush and apply a generous layer of clear glue onto the paper flower templates you've created.
- Add a few drops of food coloring onto the glue. Swirl it around gently to create beautiful gradients and blends.
- Layer another piece of plastic wrap on top of your creation to prevent it from sticking to surfaces while drying.
- Allow the suncatchers to dry completely for about 30 minutes, checking for transparency as the glue dries.
Serving
- Once fully dried, carefully peel away the plastic wrap from your suncatcher.
- Hang your beautiful flower suncatchers in a sunny window and watch the colors come alive!
- Create an entire collection for seasonal or holiday displays to keep your home feeling lively.